hadow.fr
 openPGP public key
 Matrix.org
 Gitea
Gitea- GitHub
sam(dot)hadow(at)proton(dot)me
prefer Matrix if you want to use E2EE
@fire:hadow.fr
main git
How To Install Jellyfin With Podman
by Sam Hadow
In this blog post I’ll show you how to run jellyfin with podman and how to use hardware acceleration with a NVIDIA GPU and without disabling SELinux isolation for the container.
Steps
1. switch the required booleans
For hardware acceleration we need to let containers access devices in /dev/dri. DRI means Direct Rendering Infrastructure, the devices there are all the GPUs.
By default containers are not allowed access to these devices, to allow it we need to change a boolean:
sudo setsebool -P container_use_dri_devices 1
2. container creation
I created a pod for the logic and then the jellyfin container inside it, with the systemd services it looks like this:
pod
# pod-jellyfin.service

[Unit]
Description=Podman pod-jellyfin.service
Documentation=man:podman-generate-systemd(1)
Wants=network-online.target
After=network-online.target
RequiresMountsFor=/run/user/1000/containers
Wants=container-jellyfin-app.service
Before=container-jellyfin-app.service

[Service]
Environment=PODMAN_SYSTEMD_UNIT=%n
Restart=on-failure
TimeoutStopSec=70
ExecStartPre=/usr/bin/podman pod create \
        --infra-conmon-pidfile %t/pod-jellyfin.pid \
        --pod-id-file %t/pod-jellyfin.pod-id \
        --exit-policy=stop \
        --name jellyfin \
        -p 8096:8096/tcp \
        --replace
ExecStart=/usr/bin/podman pod start \
        --pod-id-file %t/pod-jellyfin.pod-id
ExecStop=/usr/bin/podman pod stop \
        --ignore \
        --pod-id-file %t/pod-jellyfin.pod-id  \
        -t 10
ExecStopPost=/usr/bin/podman pod rm \
        --ignore \
        -f \
        --pod-id-file %t/pod-jellyfin.pod-id
PIDFile=%t/pod-jellyfin.pid
Type=forking

[Install]
WantedBy=default.target
The port 8096 inside the container is used for the web interface (http).
container
# container-jellyfin-app.service

[Unit]
Description=Podman container-jellyfin-app.service
Documentation=man:podman-generate-systemd(1)
Wants=network-online.target
After=network-online.target
RequiresMountsFor=%t/containers
BindsTo=pod-jellyfin.service
After=pod-jellyfin.service

[Service]
Environment=PODMAN_SYSTEMD_UNIT=%n
Restart=on-failure
TimeoutStopSec=70
ExecStart=/usr/bin/podman run \
        --cidfile=%t/%n.ctr-id \
        --cgroups=no-conmon \
        --rm \
        --pod-id-file %t/pod-jellyfin.pod-id \
        --sdnotify=conmon \
        --replace \
        -d \
        --name=jellyfin-app \
        --device nvidia.com/gpu=all \
        -v /home/data/podman/jellyfin/cache:/cache:Z \
        -v /home/data/podman/jellyfin/config:/config:Z \
        -v /home/data/movies:/media/movies:ro,z \
        -v /home/data/music:/media/music:ro,z \
        --label io.containers.autoupdate=registry docker.io/jellyfin/jellyfin:latest
ExecStop=/usr/bin/podman stop \
        --ignore -t 10 \
        --cidfile=%t/%n.ctr-id
ExecStopPost=/usr/bin/podman rm \
        -f \
        --ignore -t 10 \
        --cidfile=%t/%n.ctr-id
Type=notify
NotifyAccess=all

[Install]
WantedBy=default.target
Of course you’ll want to adapt these volumes with your own media directories:
        -v /home/data/movies/:/media/movies:ro,z \
        -v /home/data/music:/media/music:ro,z \
Then enable and start the container:
systemctl --user daemon-reload
systemctl --user enable --now pod-jellyfin.service
note:
for hardware acceleration I used --device nvidia.com/gpu=all as I have a NVIDIA GPU
To check that it’s working you can run:
podman exec -it jellyfin-app nvidia-smi
I should output something like this:
Fri Dec 26 13:48:07 2025
+-----------------------------------------------------------------------------------------+
| NVIDIA-SMI 580.95.05              Driver Version: 580.95.05      CUDA Version: 13.0     |
+-----------------------------------------+------------------------+----------------------+
| GPU  Name                 Persistence-M | Bus-Id          Disp.A | Volatile Uncorr. ECC |
| Fan  Temp   Perf          Pwr:Usage/Cap |           Memory-Usage | GPU-Util  Compute M. |
|                                         |                        |               MIG M. |
|=========================================+========================+======================|
|   0  NVIDIA GeForce GTX 1050        Off |   00000000:01:00.0  On |                  N/A |
| 45%   28C    P8            N/A  /   75W |      11MiB /   2048MiB |      0%      Default |
|                                         |                        |                  N/A |
+-----------------------------------------+------------------------+----------------------+

+-----------------------------------------------------------------------------------------+
| Processes:                                                                              |
|  GPU   GI   CI              PID   Type   Process name                        GPU Memory |
|        ID   ID                                                               Usage      |
|=========================================================================================|
|  No running processes found                                                             |
+-----------------------------------------------------------------------------------------+
If instead you get:
Failed to initialize NVML: Insufficient Permissions
You’ll need to install the container toolkit and generate a CDI specification file:
sudo dnf install cuda-toolkit nvidia-container-toolkit-base
sudo nvidia-ctk cdi generate --output=/etc/cdi/nvidia.yaml
If this still doesn’t work you might need to also turn another boolean on:
sudo setsebool -P container_use_xserver_devices 1
note 2:
Jellyfin documentation recommends using --device /dev/dri/:/dev/dri/ in their podman example but this doesn’t seem to work, at least not for NVIDIA GPUs. and the method described in the hardware acceleration part of the wiki is also different.
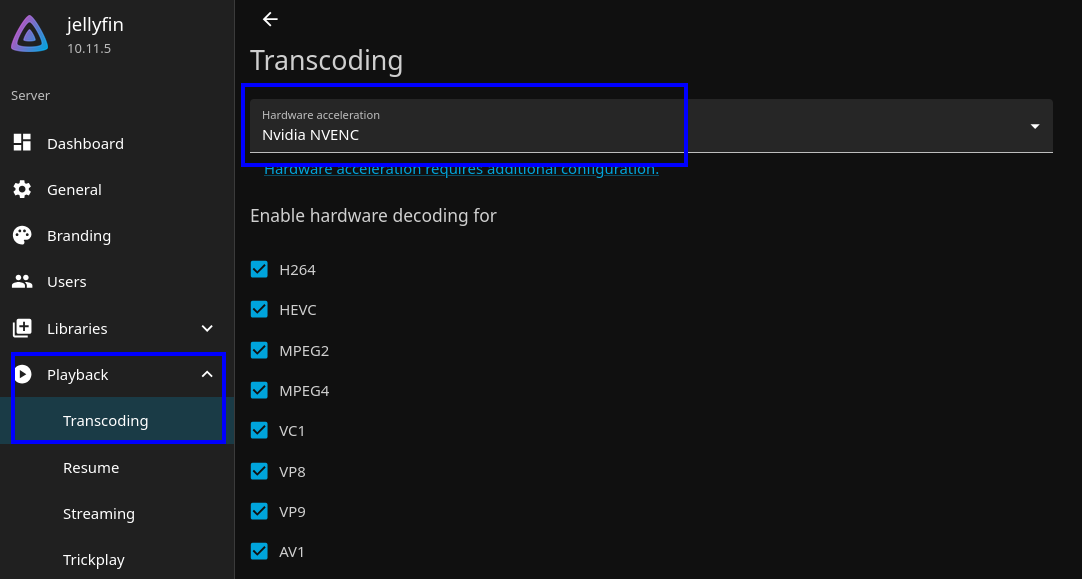
3. enabling hardware acceleration in jellyfin
In jellyfin web interface after setting up the server, you’ll want to go to your dashboard (click on the hamburger menu in the top left and then dashboard), then playback, then transcoding and from there enable hardware acceleration, with a NVIDIA GPU you should choose Nvidia NVENC.
Copyright (c) December 2025 Sam Hadow Verbatim copying and redistribution of this entire page are permitted provided this notice is preserved.